Budoshin Ju-Jitsu
The Gentle Art of Self-Defense
CorrectBanner

Ude Guruma Makikomi

Figure-4 Armbar Winding Throw

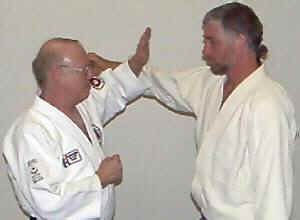
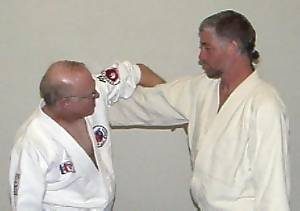
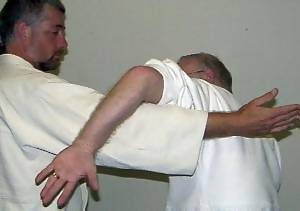
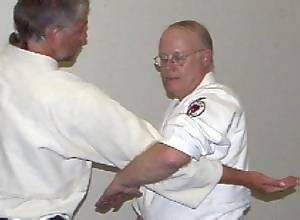
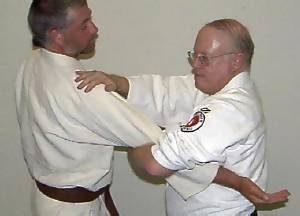
Setting up an attacker for a Figure-4 armbar can be achieved 100% of the time if you follow these simple setup steps – even against a taller attacker. It took me about a year  in Prof. Seki’s class to figure out how to set up a figure-4 armbar properly with a 100% success rate. Seki usually let us figure out the “fine points” of the art ourselves. If I figured something out Seki would say, “Ah, Joji [Japanese for George]. You finally figured it out. Good!” He did that to all of his students. Yes, he always called me “Joji.”
 Thanks to Frank Blaney for being my uke and Marc Kolodziejczyk for the photography.
#1 Block the attacker’s arm to your left as you step in.
#2 Wrap your left arm over his arm, connecting your forearm to the outer [up] side of his elbow. This is the first key part in successfully setting up the armbar.
#3 This is the same move as above, shown from the rear elbow. His elbow can be at a right angle to the ground, or slightly higer and you can still successfully set up the figure-4 armbar if you make your connection with your forearm to the outer side of his elbow.
#4 Once you have connected with the outer edge of his elbow bring his arm tight against your side as you rotate his elbow with your left forearm [your forearm moves to your right and becomes horizontal to the ground as you rotate his arm] so that his elbow is eventually is pointing to the ground. Rotating his elbow is the second key element is setting up the figure-4 armbar.
#5 Rest your right hand on the attacker’s shoulder as you complete the rotation of his arm. Notice that his arm is now resting closer to my elbow. Do not let your arm slip as you rotate his elbow. Also notice that all of my fingers and thumb are resting on his shoulder.
#6 Setting up the figure-4 armbar is completed by resting your left hand, including your thumb, on your right upper forearm. Your rotation of his elbow will also have off-balanced the attacker and set him up for the throw, which should be a snap. Pardon the pun. To execute the throw simply apply a little upward pressure with your left forearm & downward pressure with your right hand. Or, as an option, you can straighten both of your arms out slightly to off-balance him. [Although this is a much easier way to off-balance your attacker, be very careful with this option though and do it very slowly in practice.] As the attacker goes up onto his toes just pivot your right foot back counterclockwise to complete the throw.

CAUTION: Setting a figure-4 armbar as instructed in this sequence will result in an extremely tight armbar at his elbow. Be sure to let up on the pressure on your uke’s elbow as you execute the throw. Otherwise a dislocated elbow may be unavoidable.

#7 Having trouble with a taller attacker. Just deliver a quick snap kick with the ball of your foot to the outside front of his right thigh.
#8 That should cause him to drop down momentarily so you can set up the armbar. Then, if he stands backup [unless you’ve already thrown him] he’ll set his own figure-4 armbar & will really cooperate with you – or disclocate his own elbow.