Budoshin Ju-Jitsu
The Gentle Art of Self-Defense
CorrectBanner

Tai-Otoshi Fixes

Foot Setup for Proper Throw

Some people are having problems properly setting their footwork for a Tai-Otoshi. The is a tendency to place their right foot as much as 1-2 feet behind the right foot of the uke, blocking the leg just below the knee joint rather than at his ankle. As a result the right leg locks at the knee joint, thus making the throw very difficult to execute & placing a high risk of injury to both tori and uke. This series shows the correct foot placement for the tori’s right & left feet. I am NOT attempting to show the entire sequence for the Tai-Otoshi — just foot placement.
Thanks to Denny DeLos Reyes for being my uke any Michael Langewisch for the photography.
The correct positions are below.
#1 For some reason many people place their right foot too far back behind the right foot of the uke. Placing it this far back causes the leg of the tori to block the leg of the uke fairly high, sometimes even above the uke’s kneecap. Setting your foot up this far back will cause the uke’s knee joint to lock up, make it much more difficult for the tori to throw the uke [because locking the kneecap makes it difficult to pull the uke forward so that most of his weight is in front of the tori’s leg] and tremendously increases the risk of injury to both parties.

BTW: This position also makes it very easy for the uke to counter the tai-otoshi.
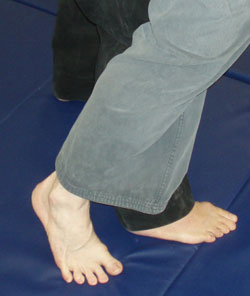
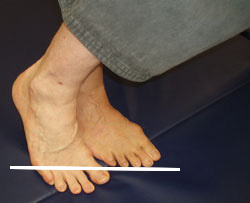
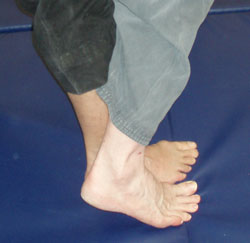
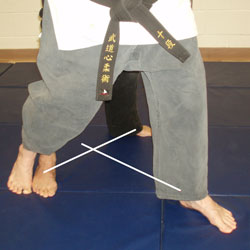
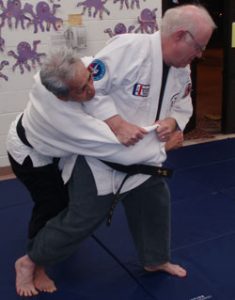
#2 If you are setting the footwork correctly, your toes should be in line with the uke’s toes. Even here my toes are about 1″ too far forward. However, my goal is to block the uke’s leg as close to his ankle as possible, so I’m still in the “forgiveness” range. I am also on the ball of my right foot, NOT resting the entire foot on the ground. My foot location allows me to get most of the uke’s weight/body in front of my leg before I execute the throw.
#3 This is just another shot of above. Notice that I am blocking the uke’s leg from the side. As I pull him forward & his body is pulled in front of my leg, his lower leg will actually go around the side of the back of my leg so that the front of his leg will be against the back of my leg [at my foot] as the throw is executed.
#4 Notice the foot position of each of my feet. My right foot is parallel to his right foot. My left foot is pointing in the direction the uke is facing [which means I’m facing the same way] and 90° [right angle] to the line between both of the uke’s feet. If you’ve read my Advanced JuJitsu book you’ll also realize that the Y-axis of the uke will come down through the juncture of the two lines in this picture.
#5 I am now set to throw Denny, my uke. Notice how most of his body is over & in front of my leg. All I have to do to execute the throw is quickly snap my right heel down to the ground which will straighten my right leg as I turn to the left — no bending over — pulling Denny to my left at the same time. All I have to move is his weight from his ankle down, not his whole body. That makes it an easy snap for my right leg and a very quick throw as most of the work has already been done. [Sorry about the artwork in the background. Our dojo meets in the Community Room at North Oaks Park, Santa Clarita.]